POV-Ray
Persistence of Vision Ray Tracer
How to make realistic
graphics images on your
personal computer.
|

|
1.0 What is POV-Ray
POV-Ray, the Persistence of Vision Ray Tracer, is a copyrighted freeware
program that can be used to generate realistic looking graphic images.
This program is available for a broad range of computers including UNIX,
Macinsosh, and IBM compatibles.
To create a picture, a scene must first be defined mathematically in
three-space using simple POV-Ray commands. These commands are similar in
syntax to the C programming language. By applying laws of math and physics,
the ray tracing program then calculates what the scene should look like.
For every pixel on the screen, a ray of light is traced from a hypothetical
camera source, backwards through the scene, carefully determining the
cumulative effects of every object it might have encountered along its way.
POV-Ray can handle very complex environments, such as reflections off of shiny
or dull surfaces, refraction of light through transparent or translucent
objects, patterns from textured surfaces or graphics, and the effects of
shadows and multiple light sources. Artists will have difficulty matching
the photographic realism that POV-Ray handles with ease, but a knowledge
of art principles can help programmers produce very attractive computer
graphics with ray tracing.
In every POV-Ray scene, there are three essential elements:
- A camera to take
the picture
- A light source to illuminate the scene
- Some objects to draw
The POV-Ray program will read a description of the scene from a standard
ASCII text file that defines the shapes, colors, textures and lighting in
parameters. The program then mathematically simulates the rays of light in
the scene and produces a photo-realistic image. You should be warned that
the more complicated the scenes, the longer it will take to render the
image. Some ray-traced images may take many hours or even days
to render on a personal computer.
2.0 POV-Ray Resources
There are many POV-Ray resources on the Internet. These are just a few
links you might pursue:
The POV-Ray source comes with excellent documentation. The postscpipt version
is over 500 pages long.
3.0 Creating an Image Using POV-Ray
POV-Ray is an easy program to use. First define the scene in a text
file using the POV-Ray commands. Any standard editor will do. Our students
in the CS Lab often use the normal UNIX editor, "vi", or other editors of
preference such as "emacs". Then run the program by typing
the povray command with appropriate options. At Jefferson, we often
generate small images first to check for lighting and object placement,
and then will generate a larger graphic for a final display.
Here is an example command line to run the ray tracer.
- x-povray -Isphere1.pov +V +D0 +P
+X100 +FP16 +Osphere1.ppm -H240 -W320
This command runs x-povray, the X-Windows version of POV-Ray, on
our LINUX systems in the CS Lab at Jefferson. The following options were used:
-
-I Include the source file sphere1.pov
+V Give Verbose output as the rendering is proceeding
+D0 Display the picture to the console as it is being generated
+P Pause for input from the mouse before erasing
the image
+X100 Enable eXit after every 100 pixels in case
the user wishes to terminate the rendering.
+FP16 Generate a PPM File in 16 bit color
+O Give the Outfile the name
sphere1.ppm
-H240 Make the Height 240 pixels
-W320 Make the Width 320 pixels
At the same time POV-Ray is writing an image to the screen, it is also
writing an image file to disk. In this example, the file will be called
sphere1.png and will be in the "PNG" file format (Portable Network Graphic). We typically use the program xv for manipulating or printing graphics files but for files conversions from this
file format, try using ee (Electric Eyes). The program ee
is very easy to use for converting between many file formats but doesn't
have as many built-in editing tools.
Here are some sample scripts we use to make life easier when running
POV-Ray at TJ.
- mypov - generates a small graphic image in ppm format (Portable PixelMap), and moves the file it generates into a directory called "images"
- bigpov - generates a larger graphic with better quality and moves it to a directory called "images"
- clockpov - generates a PPM file using
the clock variable that also becomes part of the file name but leaves the result in the same directory.
4.0 Some Classroom Examples
-

|
Sphere 1:
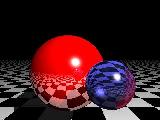
This program generates a simple shiny red sphere
floating over a black and white checkerboard plane.
It is the equivalent of "Hello World" in POV-Ray.
Source Code
|

|
Sphere 2:
This program adds a second sphere, but the new object has
different properties. It is light blue and transparent,
showing how light is refracted through the glass like
substance.
Source Code
|

|
Sample Objects:
In addition to a shiny red sphere, this program
draws a variety of other objects including a
yellow metallic box with a textured surface,
a blue glass torus that intersects the box,
a green cone with a portion removed, and a
white blob formed as a union of several spheres.
The blob has a scanned image of one of the author's
floral paintings wrapped around its surface.
Source Code and
Floral Painting GIF file
|
5.0 Some Student Projects That Used POV-Ray
-
Instructors:
Donald W. Hyatt:
dhyatt@tjhsst.edu
Phyllis T. Rittman:
prittman@tjhsst.edu


